
Black & Decker Weed Trimmer Manual: A Comprehensive Guide
Welcome! This manual provides essential guidance for Black & Decker weed trimmer owners, detailing assembly, operation, maintenance, and troubleshooting.
Ensure optimal performance and longevity of your tool with these instructions, alongside crucial safety precautions for a seamless trimming experience.
Black & Decker has a long-standing reputation for producing reliable and innovative power tools, and their weed trimmers are no exception. Designed for homeowners tackling yard maintenance, these trimmers offer a blend of power, convenience, and affordability. Whether you’re edging along walkways, trimming around obstacles, or clearing overgrown areas, a Black & Decker weed trimmer can significantly simplify your landscaping tasks.
This manual serves as a comprehensive resource for all Black & Decker weed trimmer models. It covers everything from initial setup and safe operation to routine maintenance and troubleshooting common issues. Understanding the features and capabilities of your specific model is crucial for achieving optimal performance and ensuring your safety.
Black & Decker weed trimmers are available in various configurations, including cordless electric, corded electric, and gas-powered options. Cordless models offer freedom of movement, while corded models provide consistent power. Proper care, including battery maintenance for cordless versions, will extend the life of your trimmer and keep your yard looking its best. Remember to always prioritize safety when operating any power tool.
Understanding Your Model: Identifying Key Parts
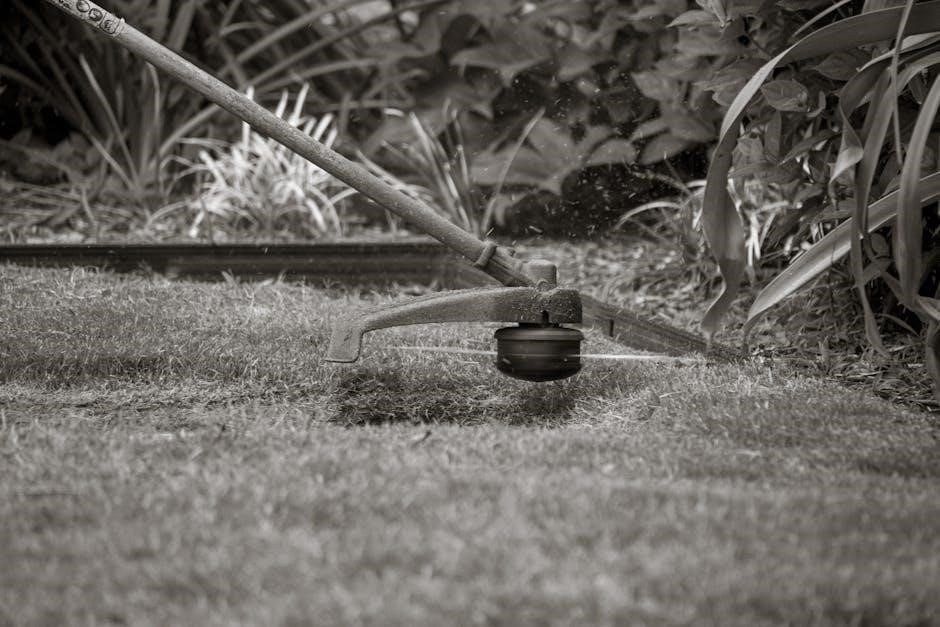
Familiarizing yourself with the components of your Black & Decker weed trimmer is essential for safe and effective operation. Key parts include the motor housing, which contains the motor and drive mechanism; the trimmer head, where the cutting line is located; and the shaft, connecting these two components.
The guard is a crucial safety feature, protecting you from flying debris; The handle provides a comfortable grip and control during use. Corded models will have a power cord and a corresponding plug. Cordless models feature a battery compartment and charging port.
Pay attention to the line feed mechanism, responsible for advancing the cutting line. The spool releases line as needed during trimming. Also, identify the adjustment features, allowing you to customize the trimmer’s height and angle for optimal comfort and reach. Refer to the diagrams in this manual to pinpoint the exact location of each part on your specific model. Knowing these parts aids in assembly, maintenance, and troubleshooting.
Safety Precautions: Before You Begin
Prioritize safety when operating your Black & Decker weed trimmer. Always wear eye protection to shield against flying debris. Sturdy footwear is essential, and long pants are recommended. Never operate the trimmer in wet conditions, as this increases the risk of electric shock (for corded models).
Before each use, inspect the trimmer for any damaged parts. Ensure the guard is securely attached – never remove or disable it. Keep bystanders, especially children and pets, at a safe distance. Be mindful of your surroundings, checking for hidden objects or obstacles in the trimming area.
Never modify the trimmer in any way. Use only genuine Black & Decker replacement parts. Disconnect the power source (unplug corded models or remove the battery from cordless models) before performing any maintenance or adjustments. Avoid operating the trimmer if you are tired or under the influence of drugs or alcohol. Always follow these guidelines for a safe trimming experience.
Assembly Instructions: Putting It All Together
Begin by carefully unpacking all components and verifying against the parts list in this manual. Attach the handle to the trimmer shaft, ensuring a secure fit and tightening all screws firmly. Next, install the guard, aligning it correctly and locking it into place – never operate without the guard.
If your model requires it, connect the auxiliary handle for enhanced control and comfort. Ensure all connections are snug and stable before proceeding. Carefully thread the trimmer line into the spool housing, following the diagram provided. Properly seat the spool within the trimmer head, ensuring smooth line feeding.
Double-check all attachments for stability. A loose assembly can lead to operational issues or potential hazards. Refer to the included diagrams for visual guidance. Once assembled, briefly test the trimmer’s functionality (without vegetation) to confirm proper operation.
Powering Your Trimmer: Battery & Charging
Your Black & Decker weed trimmer is powered by a rechargeable battery, offering cordless convenience. Before initial use, it’s crucial to fully charge the battery for optimal performance. Utilize the Black & Decker 12V charger (model 244374) specifically designed for your battery. Connect the charger to a standard electrical outlet and insert the battery pack, ensuring proper alignment.
The charger’s indicator light will illuminate, signaling the charging process. Allow the battery to charge for a minimum of 24 hours initially, and subsequently, until the indicator light changes, signifying a full charge. Avoid interrupting the charging cycle.
To maximize battery life, avoid deep discharge and always store the battery in a cool, dry place. Do not expose the battery to extreme temperatures or direct sunlight. Regularly inspect the battery for any signs of damage or corrosion.

Charging the Battery: Using the Black & Decker 12V Charger (244374)
To charge your Black & Decker weed trimmer’s battery using the 12V charger (244374), first, ensure the charger is connected to a standard, functioning electrical outlet. Carefully insert the battery pack into the charger, aligning the contacts correctly – do not force it. The charger’s LED indicator light will illuminate, typically red, to indicate charging is in progress.
A full charge typically takes several hours, though an initial 24-hour charge is recommended for optimal battery conditioning. The indicator light will change color, often to green, when the battery is fully charged. Disconnect the charger from the outlet and remove the battery.
Important: Only use the specified Black & Decker 12V charger. Using incompatible chargers may damage the battery or pose a safety risk. Avoid charging in extremely hot or cold environments. Regularly inspect the charger cord for damage.
Battery Care and Maintenance
Maximize the lifespan and performance of your Black & Decker weed trimmer’s battery with proper care. Avoid completely discharging the battery, as this can reduce its capacity over time; It’s best to recharge when the battery begins to lose power, rather than waiting until it’s fully depleted.

Store the battery in a cool, dry place, away from direct sunlight and extreme temperatures. Long-term storage should be with the battery partially charged. Periodically check the battery terminals for corrosion and clean them with a dry cloth if necessary.
Do not disassemble or modify the battery pack. Dispose of old batteries responsibly, following local regulations for battery recycling. Avoid dropping or subjecting the battery to physical shock. Regularly inspect the battery for any signs of damage, such as cracks or swelling, and discontinue use if any are found.
Operating Instructions: How to Use Your Weed Trimmer
Before starting, ensure the battery is fully charged and securely installed. Always wear appropriate safety gear, including eye protection and closed-toe shoes. Hold the trimmer firmly with both hands, maintaining a balanced stance.
To initiate operation, activate the power switch. Begin trimming at a slight angle, moving the trimmer head in a sweeping motion. Avoid forcing the trimmer; let the line do the work. Keep the trimmer head away from your body and other individuals.
For optimal results, trim in short bursts, allowing the motor to cool between uses. Be mindful of obstacles such as rocks, fences, and trees. Avoid trimming in wet conditions. Regularly check the line length and replenish as needed. Always turn off the trimmer and disconnect the battery before making any adjustments or performing maintenance.
Cutting Techniques: Achieving Optimal Results
To achieve clean and efficient cuts, employ a sweeping, arc-like motion rather than attempting to force the trimmer directly into the weeds. Maintain a consistent speed and avoid overcrowding the cutting area. For thick vegetation, gradually work your way through it, taking multiple passes at varying angles.
Utilize an edging technique for precise trimming along sidewalks, driveways, and flowerbeds. Tilt the trimmer head and guide the line along the desired edge. Be cautious around delicate plants and structures. Remember to avoid contact with hard surfaces, as this can accelerate line wear.
For stubborn weeds, consider a back-and-forth sawing motion. Regularly inspect the line for damage and replace it as needed. Proper technique minimizes strain on the trimmer and maximizes battery life, ensuring a beautifully maintained landscape.
Adjusting the Trimmer: Height & Angle
Your Black & Decker weed trimmer’s adjustable shaft allows for customized comfort and control. Extend or retract the shaft to suit your height, ensuring a comfortable grip and reduced strain during use. Securely tighten the locking mechanism after each adjustment to prevent slippage.
The trimmer head also features adjustable angles, enabling versatile trimming in various terrains and around obstacles. Rotate the head to access hard-to-reach areas, such as under decks or along fences. Remember to lock the head in the desired position before commencing trimming.

Proper adjustment is crucial for optimal performance and safety. An incorrectly adjusted trimmer can lead to fatigue, reduced cutting efficiency, and potential hazards. Regularly check and readjust as needed to maintain a comfortable and controlled trimming experience.

Maintenance & Care: Keeping Your Trimmer in Top Condition
Regular maintenance is vital for extending the life and ensuring the optimal performance of your Black & Decker weed trimmer. After each use, inspect the trimmer for any signs of damage, such as cracks or loose parts. Clean the trimmer thoroughly, removing any grass clippings or debris that may have accumulated.
Periodically check the trimmer line and replace it when necessary. A worn or broken line reduces cutting efficiency and can pose a safety hazard. Ensure the spool is properly installed and the line feeds smoothly. Lubricate moving parts as recommended to reduce friction and wear.
Store your trimmer in a clean, dry place, away from direct sunlight and extreme temperatures. Proper storage prevents corrosion and damage. Following these simple maintenance steps will keep your Black & Decker weed trimmer in top condition for years to come.
Replacing the Spool: Line Feed & Replacement
When the trimmer line is depleted or broken, replacing the spool is straightforward. First, disconnect the battery to prevent accidental activation. Locate the spool housing and open it according to your model’s instructions – typically involving a release button or twisting mechanism.
Remove the empty spool and clean the housing of any debris. Insert the new spool, ensuring the line feeds in the correct direction as indicated by the arrows on the spool or housing. Secure the spool housing cover, ensuring it clicks or locks into place.
To ensure proper line feed, gently tap the spool housing against a hard surface or manually advance the line by pressing the line feed button. Avoid overfeeding, which can cause tangling. Always use Black & Decker approved replacement spools for optimal performance and safety.
Cleaning Your Trimmer: Removing Debris
Regular cleaning is vital for maintaining your Black & Decker weed trimmer’s performance and extending its lifespan. Always disconnect the battery before any cleaning procedure. After each use, wipe down the trimmer housing with a damp cloth to remove grass clippings and dirt.
Pay close attention to the spool housing, removing any accumulated debris that could impede line feed. Inspect the trimmer head for tangled line or obstructions and clear them carefully. Use a soft brush to clean the motor vents, preventing overheating.

Avoid using harsh chemicals or abrasive cleaners, as these can damage the plastic components. For stubborn debris, a gentle stream of water can be used, but ensure the trimmer is completely dry before reattaching the battery. Proper cleaning ensures efficient operation and prevents premature wear.
Troubleshooting Common Issues
Encountering problems with your Black & Decker weed trimmer? Here’s a guide to resolving frequent issues. If the trimmer won’t start, first ensure the battery is fully charged and correctly inserted. Check the safety lock-off and trigger – they must be engaged properly. Inspect the spool for jammed or broken line, as this can prevent operation.
For line feed problems, ensure the spool is installed correctly and the line is not tangled. Gently tap the spool head against a hard surface to encourage line release. If jamming persists, remove the spool, unwind the line, and rewind it neatly.
Overheating can occur if the guard is missing or the motor vents are blocked. Always use the guard and keep vents clear. If issues continue, consult the warranty information or contact Black & Decker customer support.
Trimmer Won’t Start: Possible Causes & Solutions
If your Black & Decker weed trimmer fails to start, several factors could be at play. First, verify the battery is fully charged using the Black & Decker 12V charger (244374) and properly inserted into the trimmer. A depleted or incorrectly seated battery is a common culprit.
Next, confirm the safety lock-off button and trigger are engaged simultaneously. These mechanisms prevent accidental activation and must be operated correctly. Inspect the spool for tangled or broken trimmer line, as obstructions can stall the motor.
Additionally, check for debris blocking the motor vents, potentially causing overheating and shutdown. Ensure the guard is correctly installed; the trimmer may not operate without it. If these steps don’t resolve the issue, consult the full manual or contact customer support.

Line Feed Problems: Addressing Jamming & Breakage
Experiencing issues with line feed on your Black & Decker trimmer? Commonly, jamming occurs due to improperly wound line on the spool or debris accumulation within the line feed mechanism. Carefully remove the spool, inspect for tangles, and rewind the line neatly, ensuring it doesn’t overlap.
Frequent line breakage often indicates using the incorrect line diameter or encountering tough vegetation. Always refer to your manual for the recommended line size. If the line breaks repeatedly, reduce trimming pressure and avoid contact with hard surfaces.
To clear a jam, detach the spool and gently pull the line ends to release any obstructions. Ensure the line feed button is functioning correctly and isn’t damaged. Regular cleaning and proper line management will minimize these issues, extending your trimmer’s efficiency.
Parts & Accessories: Finding Replacements
Maintaining your Black & Decker weed trimmer requires occasional part replacements. Commonly needed items include replacement trimmer line spools, guards, and batteries (for cordless models). Genuine Black & Decker parts are recommended to ensure compatibility and optimal performance.
You can find these parts at various retailers, including home improvement stores like Lowe’s and Home Depot, as well as online marketplaces such as Amazon and the official Black & Decker website. When ordering, always have your trimmer’s model number handy to guarantee you receive the correct components.

Consider purchasing extra batteries if you have a cordless trimmer to extend your working time. Additionally, replacement guards are crucial for safety. Black & Decker also offers accessory kits containing multiple spools of line and other useful items for convenient maintenance.
Warranty Information: Understanding Your Coverage
Black & Decker stands behind its weed trimmers with a limited warranty, protecting against defects in materials and workmanship. The standard warranty period typically ranges from two to three years, depending on the specific model and region. It’s crucial to register your trimmer online after purchase to activate the warranty and streamline any future claims.
The warranty covers repairs or replacements of defective parts, but it does not cover damage caused by misuse, accidents, or normal wear and tear. Always retain your proof of purchase (receipt) as it’s required for warranty service. To initiate a claim, contact Black & Decker’s customer support through their website or phone number.
Be aware that unauthorized repairs or modifications may void the warranty. Review the complete warranty details included with your trimmer for specific terms and conditions. Proper maintenance, as outlined in this manual, also contributes to maintaining warranty validity.
Black Desert Online Updates (March 5, 2026) ─ Note: Included due to internet data, but tangential

Please note this section pertains to updates for the online game, Black Desert Online, and is included due to data retrieval during research, but is unrelated to the Black & Decker weed trimmer manual. On March 5, 2026, Black Desert Online received a substantial patch containing 142 updates, totaling approximately 0.79GB in size. These updates focused on enhancing gameplay, addressing bug fixes, and improving overall performance.
Adventurers were greeted with new content, including refinements to existing quests and the introduction of minor quality-of-life improvements. The patch also included adjustments to class balance, aiming to create a more competitive and engaging player experience. Pearl Abyss, the game developer, continues to actively listen to community feedback and implement changes accordingly.
For detailed information regarding these updates, players are encouraged to visit the official Black Desert Online website or forums. This information is provided for context only and does not relate to the operation or maintenance of your Black & Decker weed trimmer.
Black Desert Online Updates (February 12, 2026) ー Note: Included due to internet data, but tangential
Please be aware that this section details updates for Black Desert Online, an online game, and is present due to data collection during research, but is entirely unrelated to the Black & Decker weed trimmer manual. On February 12, 2026, Black Desert Online underwent a significant update, introducing a total of 217 changes with a download size of approximately 0.96GB. This patch aimed to improve the overall gaming experience for adventurers.
The updates encompassed various aspects of the game, including bug fixes, performance optimizations, and content enhancements. Players experienced improvements to existing systems and the addition of new features designed to enhance gameplay. Pearl Abyss, the developers, consistently strive to refine the game based on player feedback and ongoing development.
For a comprehensive list of changes and detailed information, players are advised to consult the official Black Desert Online website or community forums. This information is included solely for informational purposes and has no bearing on the use or maintenance of your Black & Decker weed trimmer;
Black Desert Online Scheduled Maintenance (March 12, 2026) ー Note: Included due to internet data, but tangential
Please note this section pertains to scheduled maintenance for Black Desert Online, an online role-playing game, and is included due to data collection during research. It is unrelated to the Black & Decker weed trimmer manual. On March 12, 2026, Pearl Abyss announced a scheduled maintenance period for Black Desert Online. The purpose of this maintenance was to implement service improvements and introduce the latest game updates.
During the maintenance window, access to the game servers was temporarily unavailable. Players were advised to log out before the maintenance began to avoid potential issues. The developers aimed to minimize downtime and restore service as quickly as possible. Regular updates and maintenance are crucial for ensuring a stable and enjoyable gaming experience.
For specific details regarding the maintenance schedule and any potential impact on gameplay, players were directed to the official Black Desert Online website and community channels. This information is provided for context only and does not relate to the operation or care of your Black & Decker weed trimmer.